Not every pairing that looks possible in Mewgenics is actually a good idea.
A pair can look harmless on the surface and still be risky if both cats trace back to the same dominant bloodline. That is the real trap with breeding risk: players often look only at the two cats in front of them, when the bigger danger is hidden in the family tree behind them.
Use this guide before breeding, when you are still deciding whether the pairing is worth the risk.
If you only remember one rule, make it this:
A pairing is risky when it tightens your bloodline faster than it improves your future options.
Quick answer
A pairing is too risky in Mewgenics when one or more of these are true:
- the cats are obviously too close, such as siblings or parent-child
- both cats loop back into the same bloodline repeatedly
- the same powerful ancestor keeps showing up on both sides of the family tree
- your house has stopped bringing in enough strays to refresh the gene pool
- you are taking the risk for vague upside instead of a specific goal
- you do not already know how you will reset the line afterward
That is the fast answer. The rest of this page shows how to judge risk before you press breed.
1. Why “they are not immediate family” is not enough
This is the first mistake most players make.
A pairing can be risky even when the two cats are not obviously close on the surface. The danger is not just “are these two direct relatives right now?” The danger is whether both cats are still being pulled from the same shrinking bloodline.
That is why some lines feel safe for a while and then suddenly start producing worse outcomes: the house has been reusing the same ancestry so often that the line is tighter than it looks.
The practical rule
Do not ask only:
“Are these two cats close relatives?”
Also ask:
“Do these two cats come from the same dominant bloodline?”
That second question is the one that catches the real risk.
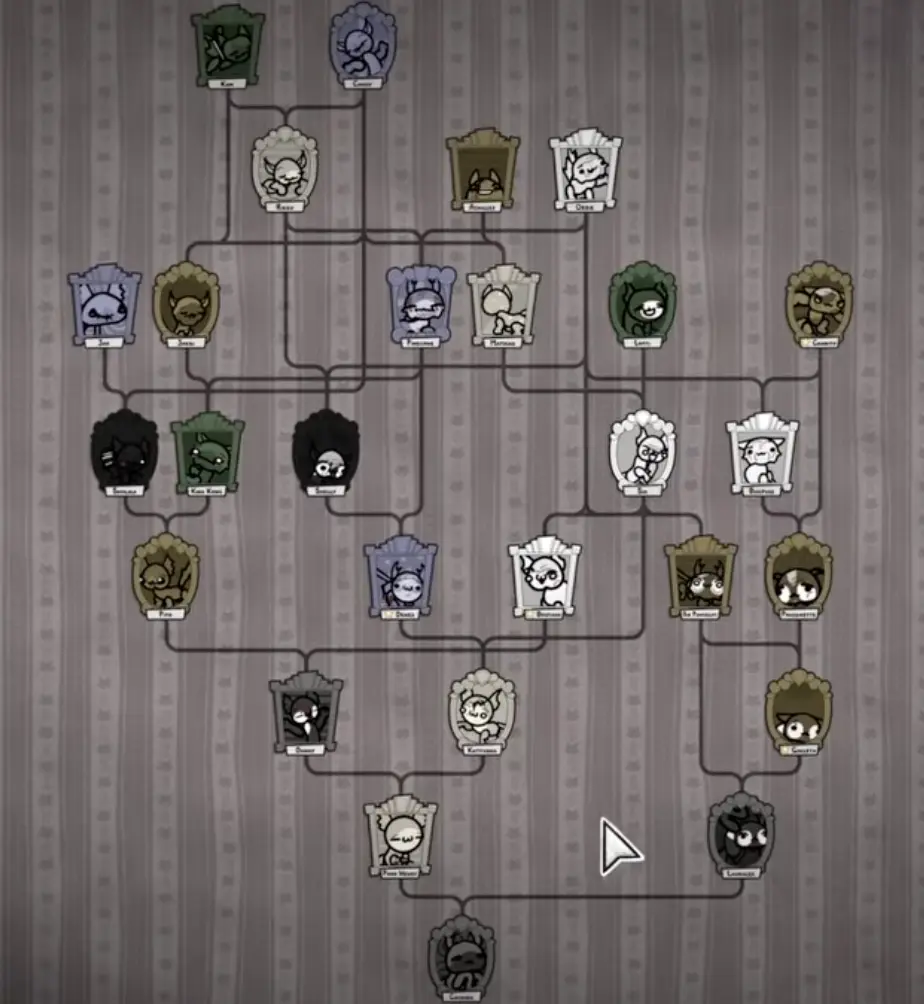
2. The Family Tree is your actual risk checker
If breeding matters to you, Family Tree is not optional. It is the real risk tool.
Once you upgrade Tink far enough, you can inspect the family tree directly instead of trying to remember relationships from memory. SlashSkill’s guide frames Tink Level 2 as the point where Family Tree access becomes available, which is exactly why it matters so much for pairing safety. Strays also matter here because they are always coefficient 0, which makes them the cleanest “bloodline diluter” in the system.
Why this matters
A risky pairing often does not look risky from the room view alone.
Two cats can seem far enough apart until you open the tree and realize:
- they both route back to the same ancestor
- the same line appears on both sides
- the house has been recycling one elite family for too long
If you are still choosing pairings without checking Family Tree, you are not really checking risk.
3. The numbers that actually define the danger zone
This is the piece most general guides stop short of spelling out.
The community wiki gives you a real threshold model for how inbreeding coefficient turns into defects:
- all kittens have a baseline 2% birth-defect disorder risk
- once the coefficient goes above 0.2, that risk starts rising linearly
- at the maximum coefficient, it reaches 42%
- once the coefficient goes above 0.05, body-part defects can begin
- once the coefficient goes above 0.9, body-part defects are applied in two passes, which usually makes the result effectively unusable
That gives you a much better risk table than vague “be careful” language.
| Inbreeding coefficient | What it means | Recommendation |
|---|---|---|
| 0–0.05 | Baseline 2% birth-defect disorder risk; no body-part defect roll yet | Green — safe enough to build on |
| 0.05–0.2 | Baseline disorder risk remains, but body-part defects can now start | Yellow — only do this on purpose |
| 0.2–0.9 | Birth-defect disorder risk scales up from 2% toward 42% | Red — usually avoid |
| 0.9+ | Defect parts are applied in two passes | Dead zone — walk away unless you are doing something extremely specific and disposable |
This is the table that turns “red / yellow / green” from a feeling into a real decision tool.
4. A quick Closeness rule for real play
If you are staring at a family tree and need a fast read, use a simple Closeness screen before you overthink it.
The cleanest practical shorthand is:
- Closeness 1–2 → almost always red
- Closeness 3–4 → yellow, only do it for a specific reason
- Closeness 5+ → often workable because the line starts diluting instead of tightening
This is not a replacement for coefficient math. It is a pre-check that tells you whether the pairing deserves deeper inspection.
Why this helps
Most players do not need to calculate every pairing from scratch every night.
They need a rule that tells them:
- “drop this immediately”
- “maybe, but only if I know why”
- “safe enough to keep considering”
That is what Closeness is good for.
5. What a risky family tree actually looks like
The Family Tree matters because it reveals patterns that room view cannot.
When you are deciding whether a pairing is too risky, look for these warning signs.
Repeated shared ancestry
If both cats repeatedly connect back to the same ancestor line, that is the clearest warning sign.
One shared ancestor far back is not the same as seeing the same line over and over again. Repetition is what turns a “maybe” into a real bloodline problem.
A house built around one “super-cat”
This is one of the easiest late-game traps.
You get one incredible breeder with amazing stats or mutations, and then the whole house starts orbiting around that line. At first it feels efficient. Later, it means nearly every pairing still traces back to the same source.
That is how a house can look large while its genetic diversity is actually shrinking.
Thin side branches
If one branch of the tree is doing all the work and the other branch barely introduces anything new, the pairing is usually riskier than it seems.
No fresh blood recently
If your best recent pairings are all internal and you have not folded in a strong stray for a while, the line is usually getting tighter whether you notice it or not.
6. Red / Yellow / Green: a real pairing screen
Most players do not need a perfect theory model every night. They need a fast rule.
That is why this page works best as a red / yellow / green screen.
Red: too risky right now
These are the pairings you usually should not run:
- siblings
- parent-child
- pairings where the same ancestor line appears all over both trees
- pairings already sitting in the coefficient danger zone
- pairings that only look good because your entire house already comes from one dominant lineage
These are the pairings most likely to tighten the line fast and create longer-term problems.
Yellow: controlled risk
These are the pairings that might be acceptable, but only if you are doing them on purpose:
- more distant shared bloodlines
- lines that still overlap, but not at the most immediate level
- cases where you are pushing for a very specific stat, mutation, or trait goal
This is the category where “worth it” depends on your discipline. If you do this too often, yellow becomes red.
Green: safe enough to build on
These are the pairings you usually want more of:
- clearly separate bloodlines
- new strays folded into the line
- cats whose trees do not keep collapsing into the same ancestor
- branches that widen your future options instead of narrowing them
The point is not to eliminate all risk forever. The point is to stop your best breeders from becoming trapped inside one shrinking family circle.
7. The “One and Done” rule
This is the cleanest answer to the question:
“Can a risky pairing ever be worth it?”
Yes — but only if you already know how you are going to reset the risk immediately afterward.
SlashSkill’s best practical summary of that is the One and Done rule:
Inbreed one generation deliberately to lock a recessive trait or rare mutation, then immediately breed that offspring with an unrelated stray.
That is what makes a risky pairing controlled instead of reckless. It lets you capture something valuable without letting the whole bloodline spiral.
Why this matters
A lot of players understand “this pairing might be worth the risk,” but they stop there.
The more important question is:
“What happens to the line after I do it?”
If your answer is “I do not know yet,” the pairing probably is not controlled enough.
If your answer is “I already know which stray I’m using next,” then the risk case becomes much stronger.
8. Body shape changes whether the pairing is worth it
This is one of the most underused decision variables in breeding.
According to SlashSkill’s community-oriented guide, body shapes are not cosmetic in the way players often assume. Their shorthand is:
- triangle heads tend to favor Intelligence
- square heads tend to favor Defense
That means body shape changes the risk-reward calculation before you even look at the family tree.
Example
If you are considering a risky pairing to build a mage line, a triangle-headed pairing may justify more risk than a square-headed one. If you are building a tank line, the reverse may be true.
So before you talk yourself into a yellow pairing, ask:
- do the body shapes actually point toward the class build I want?
- or am I taking bloodline risk for a pair whose body profile already fights my target?
If the body shapes are wrong for the build, the pairing becomes harder to justify.
9. Strays are not filler — they are risk control
A lot of players treat strays as backup cats or temporary utility. For breeding risk, that undersells them.
Strays are one of the cleanest ways to refresh the gene pool.
The community wiki is explicit that strays always have an inbreeding coefficient of 0, which is exactly why they are so important for long-term line health. SlashSkill’s version of the same advice is more practical: use good strays aggressively because they widen the line and let you reset after controlled inbreeding.
The practical rule
If you are repeatedly debating whether a slightly risky internal pairing is “probably fine,” that usually is your signal to look at strays first.
A fresh stray often solves the long-term problem better than one more clever cousin pairing.
10. Use icons and room separation to stop accidental risk
This is one of the smartest anti-error habits in the game.
Once you have enough Tink information, use icons to mark bloodlines and keep different lines separated physically. That gives you two layers of protection:
- visual labels so you can tell bloodlines apart quickly
- room separation so cats do not drift into accidental pairings
![]()
This matters most once the house gets big enough that memory stops being reliable. If you are managing many cats, a simple label system is much better than trusting yourself to remember every branch perfectly.
11. A real pre-breeding decision flow
If you want a fast way to screen a pairing before breeding, use this flow.
Before you commit a pairing, run this flow:
Step 1: Check Closeness
- 1–2 = red
- 3–4 = yellow
- 5+ = usually safe enough to keep evaluating
Step 2: Check Family Tree
- Are both cats still looping back to the same ancestor line?
- Does one “super-cat” dominate both trees?
Step 3: Check the coefficient zone
- 0–0.05 = green
- 0.05–0.2 = yellow
- 0.2+ = red
- 0.9+ = dead zone
Step 4: Ask what you are actually chasing
- a recessive trait?
- a rare mutation?
- a class-specific body profile?
- a specific stat stack?
If you cannot answer that clearly, do not do the pairing.
Step 5: Ask how you will reset the line
If the answer is not already “breed out with a stray next,” the pairing probably is not disciplined enough.
That is the whole point:
No goal = do not do it.
No reset plan = do not do it.
12. Pairing risk checklist
Use this before you commit a risky line.
Family Tree check
- Did you open the Family Tree first?
- Do both cats route back to the same ancestor line?
- Does the same ancestor appear repeatedly on both sides?
Bloodline check
- Has your whole house been leaning on one elite family?
- Are you breeding within the same core line again?
- Have you gone too long without bringing in a fresh stray?
Build check
- Do the body shapes actually support the class build you want?
- Are you taking bloodline risk for a pair that still mismatches your goal?
Decision check
- Is this pairing red, yellow, or green?
- If it is yellow, do you know exactly what you are chasing?
- If it is risky, do you already know how you will widen the line afterward?
If you cannot answer those clearly, the pairing is usually riskier than it is worth.
13. When to walk away from the pairing
Sometimes the best breeding decision is simply not to breed those two cats.
Walk away when:
- the only reason the pairing looks good is short-term stats
- both cats keep folding back into the same dominant bloodline
- you cannot explain why the risk is worth taking
- a stray or side branch would solve the problem more cleanly
- you are trying to force a line that is already too tight
A strong house is not built by taking every tempting pairing. It is built by protecting future options.
Related guides
If this page helped you judge the risk, these are the best next reads:
- Mewgenics Breeding Guide: How It Works — for the full breeding system, inheritance, Tink, and long-term line planning.
- Best Breeding Room Setup in Mewgenics — for room roles, furniture tradeoffs, and how to keep breeding rooms stable.
- Why Are My Cats Not Breeding in Mewgenics? — for failed pairings, compatibility, Tink, and room troubleshooting.
- Why Are My Cats Fighting in the Breeding Room in Mewgenics? — for room breakdown, Comfort failure, aggression, and the Fight Club exception.
Final take
A pairing is too risky in Mewgenics when it tightens your bloodline faster than it improves your future options.
That is why the real question is not just:
“Can these two cats breed?”
It is:
“What does this pairing do to the whole line after this generation?”
And the best tool for answering that is still the same one:
open the Family Tree before you commit.